서비스 운영방식 - standalone / inetd(xinetd)
페이지 정보
작성자 admin 작성일16-02-22 18:29 조회938회 댓글0건관련링크
본문
리눅스 서버는 서비스 운영에는 standalone 과 inet 방식이 있다.
서비스를 설정하거나 운영하려면 먼저 이 두가지 방식에 대한 이해가 필요하다
standalone - 클라언트가 서비스 요청을 하기전에 서버장비에서 해당 서버가 실행중이어야 한다.
- 대부분의 많은 서비스는 이 방식으로 운영된다.
- 이 방식으로 운영되는 서비스와 관련있는 스크립트 파일이 /etc/init.d 디렉토리에 있다.
서비스 실행 방법
standalone 으로 운영되는 서비스는 대개 서버 실행 스크립트 파일이 있으며 서버데몬 파일을 직접실행하지
않고 스크립트 파일을 통해서 올리고 내린다. 직접 실행하는것보다 안정적으로 올리고 내릴 수 있으며
서비스가 실행되는데 필요한 옵션과 인수를 몰라도 되므로 서비스를 실행하기도 쉽다.
아래처럼 어떤 서비스는 필요한 옵션이나 인수를 전달하지 않으면 서비스가 실행이 되지 않는다.
- xinetd 는 그냥 실행하면 실행이 되지 않고 옵션이나 인수가 필요하므로 직접 실행하기에는
불편하다. 서비스 명령어나 셀스크립트로 실행하면 쉽게 실행할 수 잇다.
inetd(xinetd) 서비스 방식
- 서비스를 미리 실행해 두지 않으며 클라이언트 요청시에 서비스가 자동실행되는 방식
- 자주 사용하는 서비스가 아니라면 메모리를 효율적으로 사용할 수 있다.
- 이방식으로 운영되는 서비스는 telnet, finger 서비스 등이 있다.
클라이언트가 telnet 으로 접속 시도할 경우
ex)
1. telnet server1 => 포트번호는 /etc/service 파일을 참조한다.
; ip address는 /etc/hosts 파일을 참조.
2. server1에서 실행중인 xinetd 는 클라이언트가 요청하는 포트번호를 확인하고 해당 서비스
설정을 확인한다.(/etc/service 파일 참조)
3. /etc/xinetd.conf 파일을 참조한다.
xinted.conf 맨아래에 includedir /etc/xinetd.d 가 설정되어 있으므로
/etc/xinetd.d 디렉토리의 모든 파일을 참조한다.
/etc/xinetd.d 디렉토리의 모든 파일중 서비스 이름이 클라이언트가 요청하는 서비스로 되어 있는
설정파일을 실행한다.(disable = yes 이면 서비스를 실행하지 않는다)
telnet 접속을 허용하려면 disable 설정값을 yes 로 수정해야 한다.
수정후 xinetd 를 재실행해야한다(service xinetd restart)
4. xinetd 가 telnet 서비스 설정파일에서 server 옵션의 설정값을 확인해서 실행한다.
(server = /usr/sbin/in.telnetd)
5. telnet client 가 서버장비의 in.telnetd 에 접속
*. 클라이언트가 telnet 접속을 끊으면 telnetd 는 메모리에서 자동으로 내려온다.
아래내용은 서버측(centos)에서 실행
-- client 가 텔넷접속을 끊는경우 접속되어 있던 in.telnetd 는 자동으로 종료된다.
(standalone 방식이라면 접속이 끊기더라도 처음에 실행된 서비스가 메모리에 남아서 대기상태에서
클라이언트의 요청을 기다린다)
-------------
inetd 데몬 프로그램은 거의 모든 유닉스 시스템에서 사용되어 왔다.
그러나 redhat 리눅스는 버전 7 부터 inetd의 기능을 확장시킨 xinetd 를 사용한다.
xinetd 는 inetd 와 비교하면 몇가지 부분이 강화되었다.
- tcp, udp, rpc 서비스에 대한 접근 제어가 가능
- 서비스 운영시간을 정해두고 특정시간에만 서비스가 클라이언트의 요청을 수락하게 할수 있다.
- 서비스 접속 기록 형태 세부적으로 설정할 수 있다.
- 일부 DOS 공격을 방어할수 있도록 구동되는 데몬 갯수를 제한할 수 있다.
ex)
- 디폴트로 설정된 텔넷 파일에서 inetd 에서 지원되지 않았던 세줄을 추가하였다.
(필요한 경우에 위에서 처럼 추가해서 사용하면 telnet 서비스를 좀 더 세부적으로 활용할 수 있다)
실습문제 - xinetd 서비스 설정
1. centos2(server2) 에서 cal 을 삭제 후 centos 서버의 달력을 보일수
있도록 xinetd 방식으로 설정
centos2 에서 centos 로 55000 번 포트로 telnet 명령어로 접속했을때
달력이 실행이 되면 됩니다.
아래와 같은 조건으로 설정하면 됩니다.
telnet centos ; 이렇게 했을때는 telnet 서버로 접속이 되야 한다.
telnet centos 55000 ; 이렇게 했을때는 달력이 표시되어야 한다.
-- 현재 접속이 안되는데 위에 적혀 있는 조건대로 접속이 되면 됩니다.
*. 힌트 ; 1. 55000 번 포트를 서버측에 등록해야 한다.
2. /etc/xinetd.d 디렉토리에 cal 가 실행되게 설정파일을 하나 작성해야한다.
(그냥 만들기는 어려우므로 기존에 있는 파일을 하나 복사한 다음에 수정해 사용하면 설정하기 쉽다)
---- stand alone ---
부팅할때 자동으로 실행되는 서비스 데몬은 standalone 방식의 서비스이다.
run level 에 따라서 부팅할때 자동으로 실행되는 데몬이 결정된다.
run level 0 : /etc/rc0.d
run level 1 : /etc/rc1.d
run level 2: /etc/rc2.d
run level3: /etc/rc3.d
...
...
run level6 : /etc/rc6.d
- 이런 디렉토리에 있는 파일은 전부 shell script 파일이며 파일명의 첫글자가 대문자 S 로 시작하느 파일과
관련있는 데몬은 자동실행, 첫글자가 대문자 K로 시작하는 파일과 관련있는 서비스는 다른 런레벨로
전환될때 자동 종료된다.
ex)
/etc/init.d/vsftpd 스크립트를 사용하지 않고 스크립트를 직접 만들어서 런레벨5로 부팅할때 자동으로 vsftpd 실행하기
1. 기존의 vsftpd 스크립트는 삭제하는 대신 다른경로로 옮겨둔다.
2. /etc/init.d 디렉토리에서 아래와 같은 스크립트를 작성하거나 여기있는 소스 그대로 복사해서 붙여넣기 한다.(파일명은 ftpd 로 한다)
#! /bin/sh
start()
{
/usr/sbin/vsftpd /etc/vsftpd/vsftpd.conf
}
stop()
{
killall -9 vsftpd
}
# See how we were called.
case "$1" in
start)
start
;;
stop)
stop
;;
restart)
stop
start
;;
*)
echo "Usage $0 { start| stop| restart }"
esac
3. 실행퍼미션을 줘야 한다.
5. 런레벨 5로 부팅시 자동을 vsftpd 서비스가 실행되는지 테스트
번거롭게 부팅을 굳이 새로 하지 않아도 테스트 할수 있다. 런레벨은 다른레벨로 변경후 다시 5로 바꿔서
테스트하면 된다.
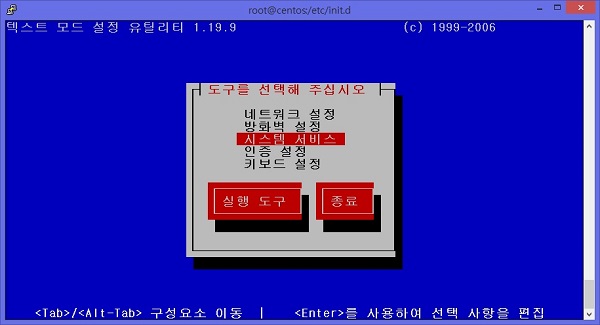
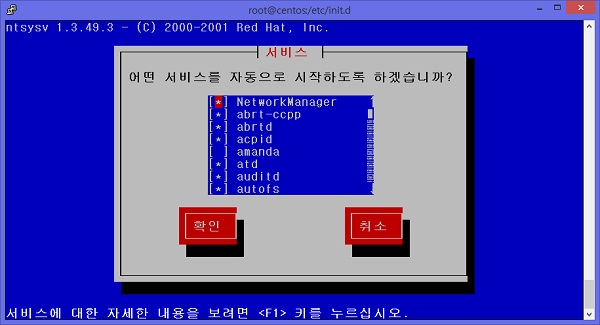
런레벨에 따라서 자동으로 실행되게 하기 위한 tool 로서 setup과 chkconfig 가 있다.
setup 은 현재 런레벨에 대한 서비스 자동 실행 설정을 할 수 있으며
chkconfig 는 모든 런레벨에 대한 서비스 자동 실행 설정 및 리스트를 출력할 수 있다.
- setup 으로 현재 런레벨에서 자동 실행되는 서비스 목록을 확인할 수 있고 자동실행설정을 할수 있다.
vsftpd 스크립트 파일은 /etc/init.d 에 없으므로 메뉴에서 보이지 않고
ftpd 는 chkconfig 명령어로 등록을 해야 한다.
chkconfig 로 메뉴를 등록하면 setup 메뉴에서 설정할 수 있다.
- 새로운 스크립트 파일을 등록하기 위해서는 스크립트 파일에 몇가지 내용을 추가해야 한다.
----------------------------------------------------------------------------------------
실습 - /etc/init.d/ftpd 스크립트 시작 부분에 chkconfig 를 위한 설정 추가하고
아래처럼 chkconfig 로 등록될수 있도록 설정.
(chkconfig man page 참고 및 /etc/init.d의 기존 스크립트 파일 참조)
----------------------------------------------------------------------------------------
- 만약 런레벨 3에서 vsftpd 를 자동 실행하게 하고 런레벨 5에서 자동 실행되지
않게 설정하고자 한다면 아래처럼 하면 된다.
- 이제 setup 또는 ntsysv 명령어를 실행하면 서비스 목록에 ftpd 가 보일것이다.
서비스를 설정하거나 운영하려면 먼저 이 두가지 방식에 대한 이해가 필요하다
standalone - 클라언트가 서비스 요청을 하기전에 서버장비에서 해당 서버가 실행중이어야 한다.
- 대부분의 많은 서비스는 이 방식으로 운영된다.
- 이 방식으로 운영되는 서비스와 관련있는 스크립트 파일이 /etc/init.d 디렉토리에 있다.
서비스 실행 방법
centos[/root]# vsftpd

centos[/root]# pgrep -fl vsftpd

3074 vsftpd

centos[/root]# service vsftpd start

vsftpd에 대한 vsftpd을 시작 중:                            [실패]

centos[/root]# /etc/init.d/vsftpd start

vsftpd에 대한 vsftpd을 시작 중:                            [실패]

centos[/root]# /etc/init.d/vsftpd stop

vsftpd 종료 중:                                            [  OK  ]

centos[/root]# /etc/init.d/vsftpd start

vsftpd에 대한 vsftpd을 시작 중:                            [  OK  ]

centos[/root]# /etc/init.d/vsftpd restart

vsftpd 종료 중:                                            [  OK  ]

vsftpd에 대한 vsftpd을 시작 중:                            [  OK  ]

centos[/root]# service vsftpd restart

vsftpd 종료 중:                                            [  OK  ]

vsftpd에 대한 vsftpd을 시작 중:                            [  OK  ]

centos[/root]# pgrep -fl vsftpd

3169 /usr/sbin/vsftpd /etc/vsftpd/vsftpd.conf

centos[/root]#
standalone 으로 운영되는 서비스는 대개 서버 실행 스크립트 파일이 있으며 서버데몬 파일을 직접실행하지
않고 스크립트 파일을 통해서 올리고 내린다. 직접 실행하는것보다 안정적으로 올리고 내릴 수 있으며
서비스가 실행되는데 필요한 옵션과 인수를 몰라도 되므로 서비스를 실행하기도 쉽다.
아래처럼 어떤 서비스는 필요한 옵션이나 인수를 전달하지 않으면 서비스가 실행이 되지 않는다.
centos[/root]# whereis xinetd

xinetd: /usr/sbin/xinetd /etc/xinetd.conf /etc/xinetd.d /usr/share/man/man8/xinetd.8.gz

centos[/root]# xinetd

centos[/root]# pgrep -fl xinetd

centos[/root]# service xinetd start

xinetd (을)를 시작 중:                                     [  OK  ]

centos[/root]# pgrep -fl xinetd

3237 xinetd -stayalive -pidfile /var/run/xinetd.pid

centos[/root]# service xinetd stop

xinetd 를 정지 중:                                         [  OK  ]

centos[/root]# pgrep -fl xinetdc

centos[/root]# pgrep -fl xinetd

centos[/root]# xinetd -stayalive -pidfile /var/run/xinetd.pid

centos[/root]# pgrep -fl xinetd

3264 xinetd -stayalive -pidfile /var/run/xinetd.pid

centos[/root]#
- xinetd 는 그냥 실행하면 실행이 되지 않고 옵션이나 인수가 필요하므로 직접 실행하기에는
불편하다. 서비스 명령어나 셀스크립트로 실행하면 쉽게 실행할 수 잇다.
inetd(xinetd) 서비스 방식
- 서비스를 미리 실행해 두지 않으며 클라이언트 요청시에 서비스가 자동실행되는 방식
- 자주 사용하는 서비스가 아니라면 메모리를 효율적으로 사용할 수 있다.
- 이방식으로 운영되는 서비스는 telnet, finger 서비스 등이 있다.
클라이언트가 telnet 으로 접속 시도할 경우
ex)
1. telnet server1 => 포트번호는 /etc/service 파일을 참조한다.
; ip address는 /etc/hosts 파일을 참조.
centos2[/root]# telnet centos

Trying 172.20.1.100...
2. server1에서 실행중인 xinetd 는 클라이언트가 요청하는 포트번호를 확인하고 해당 서비스
설정을 확인한다.(/etc/service 파일 참조)
centos[/root]# grep -w 23 /etc/services

telnet          23/tcp

telnet          23/udp

centos[/root]#
3. /etc/xinetd.conf 파일을 참조한다.
xinted.conf 맨아래에 includedir /etc/xinetd.d 가 설정되어 있으므로
/etc/xinetd.d 디렉토리의 모든 파일을 참조한다.
centos[/root]# grep includedir /etc/xinetd.conf

includedir /etc/xinetd.d

centos[/root]# ls /etc/xinetd.d

amanda          daytime-dgram   discard-stream  rsync          time-dgram

chargen-dgram   daytime-stream  echo-dgram      tcpmux-server  time-stream

chargen-stream  discard-dgram   echo-stream     telnet

centos[/root]#
centos[/root]# cat /etc/xinetd.d/telnet

# default: on

# description: The telnet server serves telnet sessions; it uses \

#       unencrypted username/password pairs for authentication.

service telnet

{

        flags           = REUSE

        socket_type     = stream

        wait            = no

        user            = root

        server          = /usr/sbin/in.telnetd

        log_on_failure  += USERID

        disable         = yes

}

centos[/root]#
/etc/xinetd.d 디렉토리의 모든 파일중 서비스 이름이 클라이언트가 요청하는 서비스로 되어 있는
설정파일을 실행한다.(disable = yes 이면 서비스를 실행하지 않는다)
telnet 접속을 허용하려면 disable 설정값을 yes 로 수정해야 한다.
수정후 xinetd 를 재실행해야한다(service xinetd restart)
4. xinetd 가 telnet 서비스 설정파일에서 server 옵션의 설정값을 확인해서 실행한다.
(server = /usr/sbin/in.telnetd)
5. telnet client 가 서버장비의 in.telnetd 에 접속
Connected to centos.

Escape character is '^]'.

CentOS release 6.5 (Final)

Kernel 2.6.32-431.el6.x86_64 on an x86_64

login: user1

Password:

Last login: Fri Feb 12 15:26:19 from 192.168.10.1

user1 /home/user1:$ pgrep -fl in.telnetd

3668 in.telnetd: centos2

user1 /home/user1:$
*. 클라이언트가 telnet 접속을 끊으면 telnetd 는 메모리에서 자동으로 내려온다.
user1 /home/user1:$ exit

logout

Connection closed by foreign host.

centos2[/root]#
아래내용은 서버측(centos)에서 실행
centos[/etc/xinetd.d]# pgrep -fl in.telnetd

centos[/etc/xinetd.d]#
-- client 가 텔넷접속을 끊는경우 접속되어 있던 in.telnetd 는 자동으로 종료된다.
(standalone 방식이라면 접속이 끊기더라도 처음에 실행된 서비스가 메모리에 남아서 대기상태에서
클라이언트의 요청을 기다린다)
-------------
inetd 데몬 프로그램은 거의 모든 유닉스 시스템에서 사용되어 왔다.
그러나 redhat 리눅스는 버전 7 부터 inetd의 기능을 확장시킨 xinetd 를 사용한다.
xinetd 는 inetd 와 비교하면 몇가지 부분이 강화되었다.
- tcp, udp, rpc 서비스에 대한 접근 제어가 가능
- 서비스 운영시간을 정해두고 특정시간에만 서비스가 클라이언트의 요청을 수락하게 할수 있다.
- 서비스 접속 기록 형태 세부적으로 설정할 수 있다.
- 일부 DOS 공격을 방어할수 있도록 구동되는 데몬 갯수를 제한할 수 있다.
ex)
centos[/etc/xinetd.d]# cat telnet

# default: on

# description: The telnet server serves telnet sessions; it uses \

#       unencrypted username/password pairs for authentication.

service telnet

{

        flags           = REUSE

        socket_type     = stream

        wait            = no

        user            = root

        server          = /usr/sbin/in.telnetd

        log_on_failure  += USERID

# --------------설정추가--------------------------------

        instances       = 4

        access_times    = 7:00-12:00    17:00-20:00

        onln_from       = 192.168.10.0/24

# --------------설정추가 끝.-----------------------------

        disable         = no

}


centos[/etc/xinetd.d]#
- 디폴트로 설정된 텔넷 파일에서 inetd 에서 지원되지 않았던 세줄을 추가하였다.
(필요한 경우에 위에서 처럼 추가해서 사용하면 telnet 서비스를 좀 더 세부적으로 활용할 수 있다)
실습문제 - xinetd 서비스 설정
1. centos2(server2) 에서 cal 을 삭제 후 centos 서버의 달력을 보일수
있도록 xinetd 방식으로 설정
centos2 에서 centos 로 55000 번 포트로 telnet 명령어로 접속했을때
달력이 실행이 되면 됩니다.
아래와 같은 조건으로 설정하면 됩니다.
telnet centos ; 이렇게 했을때는 telnet 서버로 접속이 되야 한다.
telnet centos 55000 ; 이렇게 했을때는 달력이 표시되어야 한다.
centos2[root /etc]# rm /usr/bin/cal

rm: remove 일반 파일 `/usr/bin/cal'? y

centos2[root /etc]# cal

-bash: /usr/bin/cal: 그런 파일이나 디렉터리가 없습니다

centos2[root /etc]# telnet centos 55000

Trying 172.20.1.100...

telnet: connect to address 172.20.1.100: Conn
-- 현재 접속이 안되는데 위에 적혀 있는 조건대로 접속이 되면 됩니다.
*. 힌트 ; 1. 55000 번 포트를 서버측에 등록해야 한다.
2. /etc/xinetd.d 디렉토리에 cal 가 실행되게 설정파일을 하나 작성해야한다.
(그냥 만들기는 어려우므로 기존에 있는 파일을 하나 복사한 다음에 수정해 사용하면 설정하기 쉽다)
---- stand alone ---
부팅할때 자동으로 실행되는 서비스 데몬은 standalone 방식의 서비스이다.
run level 에 따라서 부팅할때 자동으로 실행되는 데몬이 결정된다.
run level 0 : /etc/rc0.d
run level 1 : /etc/rc1.d
run level 2: /etc/rc2.d
run level3: /etc/rc3.d
...
...
run level6 : /etc/rc6.d
- 이런 디렉토리에 있는 파일은 전부 shell script 파일이며 파일명의 첫글자가 대문자 S 로 시작하느 파일과
관련있는 데몬은 자동실행, 첫글자가 대문자 K로 시작하는 파일과 관련있는 서비스는 다른 런레벨로
전환될때 자동 종료된다.
ex)
/etc/init.d/vsftpd 스크립트를 사용하지 않고 스크립트를 직접 만들어서 런레벨5로 부팅할때 자동으로 vsftpd 실행하기
1. 기존의 vsftpd 스크립트는 삭제하는 대신 다른경로로 옮겨둔다.
centoss[/root]# mv /etc/init.d/vsftpd /root
2. /etc/init.d 디렉토리에서 아래와 같은 스크립트를 작성하거나 여기있는 소스 그대로 복사해서 붙여넣기 한다.(파일명은 ftpd 로 한다)
#! /bin/sh
start()
{
/usr/sbin/vsftpd /etc/vsftpd/vsftpd.conf
}
stop()
{
killall -9 vsftpd
}
# See how we were called.
case "$1" in
start)
start
;;
stop)
stop
;;
restart)
stop
start
;;
*)
echo "Usage $0 { start| stop| restart }"
esac
3. 실행퍼미션을 줘야 한다.
centos2[/etc/init.d]# cat ftpd   ; 파일 작성이 완료되었는지 확인.

#! /bin/sh

start()

{

/usr/sbin/vsftpd /etc/vsftpd/vsftpd.conf

touch  /var/lock/subsys/vsftpd

}

stop()

{

 killall -9 vsftpd

}

# See how we were called.

case "$1" in

 start)

 start

 ;;

 stop)

 stop

 ;;

 restart)

 stop

 start

 ;;

 *)

 echo "Usage $0 { start| stop| restart }"

esac


centos2[/etc/init.d]# chmod 755 ftpd   ; 실행권한이 잇어야 한다.

centos2[/etc/init.d]#
4.  런레벨 5로 부팅했을때 자동으로 vsftpd 서비스가 실행되도록 하려면 아래처럼 rc5.d 에 symbolic 링크를

걸면 된다(파일명은 첫글자가 대문자S 여야 하며 뒤에 숫자는 임의로 붙여주면 된다)
centos[/etc/init.d]# cd /etc/rc5.d

centos[/etc/rc5.d]# ln -s /etc/init.d/ftpd S99ftpd

centos[/etc/rc5.d]# ls -l S99ftpd

lrwxrwxrwx. 1 root root 16 2016-02-22 17:12 S99ftpd -> /etc/init.d/ftpd

centos[/etc/rc5.d]#
5. 런레벨 5로 부팅시 자동을 vsftpd 서비스가 실행되는지 테스트
번거롭게 부팅을 굳이 새로 하지 않아도 테스트 할수 있다. 런레벨은 다른레벨로 변경후 다시 5로 바꿔서
테스트하면 된다.
centos[/etc/init.d]# who -r

         run-level 5  2016-02-22 17:18                   last=3

centos[/etc/init.d]#

centos[/etc/init.d]# pgrep -fl vsftpd  ; 이미 실행중이면 테스트를 위해서 프로세스를 죽이고 테스트.

4744 /usr/sbin/vsftpd /etc/vsftpd/vsftpd.conf

centos[/etc/init.d]# kill -9 4744

centos[/etc/init.d]#

centos[/etc/init.d]# init 3   ; run level 이 완전히 바뀌기까지 10초정도 기다린다.

centos[/etc/init.d]# who -r

         run-level 3  2016-02-22 17:19                   last=5

centos[/etc/init.d]#

centos[/etc/init.d]# init 5

centos[/etc/init.d]# who -r

         run-level 5  2016-02-22 17:21                   last=3

centos[/etc/init.d]# pgrep -fl vsftpd

5363 /usr/sbin/vsftpd /etc/vsftpd/vsftpd.conf   ; 자동 실행되었다.

centos[/etc/init.d]#


시스템을 shutdown 시킬때 vsftpd 서비스를 안전하게 내리고 서버가 꺼지도록 하려면
centos[/etc]# ln -s /etc/init.d/ftpd /etc/rc0.d/K99ftpd

centos[/etc]# ls -l /etc/rc0.d/K99ftpd

lrwxrwxrwx. 1 root root 16 2016-02-22 17:36 /etc/rc0.d/K99ftpd -> /etc/init.d/ftpd

centos[/etc]#
런레벨에 따라서 자동으로 실행되게 하기 위한 tool 로서 setup과 chkconfig 가 있다.
setup 은 현재 런레벨에 대한 서비스 자동 실행 설정을 할 수 있으며
chkconfig 는 모든 런레벨에 대한 서비스 자동 실행 설정 및 리스트를 출력할 수 있다.
- setup 으로 현재 런레벨에서 자동 실행되는 서비스 목록을 확인할 수 있고 자동실행설정을 할수 있다.
vsftpd 스크립트 파일은 /etc/init.d 에 없으므로 메뉴에서 보이지 않고
ftpd 는 chkconfig 명령어로 등록을 해야 한다.
chkconfig 로 메뉴를 등록하면 setup 메뉴에서 설정할 수 있다.
centos[/root]# chkconfig --help

chkconfig 버전 1.3.49.3 - Copyright (C) 1997-2000 Red Hat, Inc.

이 프로그램은 GNU Public License(GPL)하에 자유롭게 재배포될 수 있습니다.


사용법:   chkconfig [--list] [--type <종류>] [이름]

          chkconfig --add <이름>

          chkconfig --del <이름>

          chkconfig --override <이름>

         chkconfig [--level <레벨>] [--type <종류>] <이름>
centos[/root]#
centos[/root]# chkconfig --add ftpd  ;  인수는 /etc/init.d 에 있는 스크립트 파일명이다.

ftpd 서비스는 chkconfig 를 지원하지 않습니다

centos2[/]#
- 새로운 스크립트 파일을 등록하기 위해서는 스크립트 파일에 몇가지 내용을 추가해야 한다.
----------------------------------------------------------------------------------------
실습 - /etc/init.d/ftpd 스크립트 시작 부분에 chkconfig 를 위한 설정 추가하고
아래처럼 chkconfig 로 등록될수 있도록 설정.
(chkconfig man page 참고 및 /etc/init.d의 기존 스크립트 파일 참조)
----------------------------------------------------------------------------------------
centos[/root]# chkconfig --add ftpd

centos[/root]# chkconfig --list ftpd

ftpd            0:해제  1:해제  2:해제  3:해제  4:해제  5:활성  6:해제

centos[/root]#
- 만약 런레벨 3에서 vsftpd 를 자동 실행하게 하고 런레벨 5에서 자동 실행되지
않게 설정하고자 한다면 아래처럼 하면 된다.
centos[/root]# chkconfig --level 3 ftpd on

centos[/root]# chkconfig --level 5 ftpd off

centos[/root]# chkconfig --list ftpd

ftpd            0:해제  1:해제  2:해제  3:활성  4:해제  5:해제  6:해제

centos[/root]#
- 이제 setup 또는 ntsysv 명령어를 실행하면 서비스 목록에 ftpd 가 보일것이다.
댓글목록
등록된 댓글이 없습니다.